How to Restore Photos: A Step-by-Step Guide to Fixing Your Damaged Images
Are your photos pixelated? Are they fuzzy, out of focus, or maybe just too small to see clearly? Restoring old photos is not uncommon. Images can become unviewable due to yellowing pages, discoloration and other factors over time. Not only old photos, during the daily shooting, even the most careful photographers can run into problems from time to time. Poor lighting, camera glitches, or an accidental snap at a moment when your subject wasn’t quite ready to be photographed can all lead to fuzzy or grainy photos. This happens to everyone. Luckily, there are several different ways you can go about trying to restore them. Check out this guide on how to restore low-quality photos with ease and learn more about photo restoration!
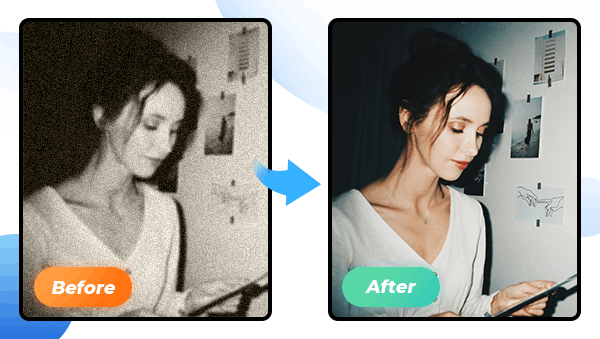
Part1: Common Ways to Restore Photos
There are two main types of ways that people are currently restoring their photos.
1. Using Professional Photo Editing Software
The first category is to use professional photo editing software like Adobe Photoshop or Luminar Neo. There is no doubt that Photoshop is the most professional of all image edit software. It has more features than any other photo editor, allowing you to edit your images with unlimited creativity. Photoshop can do almost everything from removing scratches, scuffs, and stains to improving the complexion, straightening hair, and whitening teeth. It has a range of color correction tools that allow you to work in layers. As powerful as it is, the use of the various buttons and the custom parameter settings is certainly a very complex and daunting task for someone who has not specifically learned how to use this software. Well, of course, as one of the most professional and widely used editing software, you can find many tutorials online, if you don't mind such a huge learning curve and its expensive subscription fees. Likewise, Luminar Neo is more versatile and flexible in terms of freedom, but it's not for beginners either.
2. Using AI-based Photo Enhancer Software
The second category is the software that uses AI technology to restore photos. Most of them use AI face recognition technology to eliminate blurred noise by setting the resolution and repairing them with one click; the general principle is to train AI to recognize people, plants and things, sift through big data to presume the regular use of color and partition the color. This type of software is perfectly for users who do not know how to use professional editors. However, what is lost in such a simple operation is the freedom to create pictures. There are many such software available, and many people may be overwhelmed and not know how to choose a good and cheap or even free photo enhancer. So, this article will introduce you to a good online photo enhancer.
Part2: Restore Photos with AVC.AI
AVC.AI is an advanced online tool that uses artificial intelligence to improve the quality of digital photos. It is able to automatically detect and correct various common photo problems, such as poor lighting, low contrast, and blurry images. The results are often dramatic, and can greatly improve the overall look of a photo, and the results can be previewed in real-time, so you can see exactly how the AI is improving your photo.
Steps to Restore Photos with AVC.AI
Step 1: Log Into AVC.AI
Go to AVC.AI website. Then log into your account. If you don’t have an account, click on the Sign Up button to create one.

Step 2: Upload your Photos
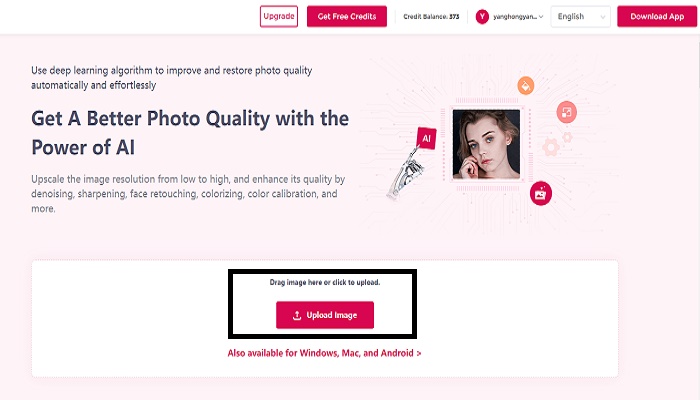
Click the Upload Image button or drag and drop the source image directly to the site. This enhancer supports batch processing. After uploading pictures, you can also click Upload New Images to upload more photos.
Note: Supported input formats are: *.png, *.jpg, *.jpeg, *.bmp, *.jfif, and *.webp.
Step 3: Select AI Models and Start Processing
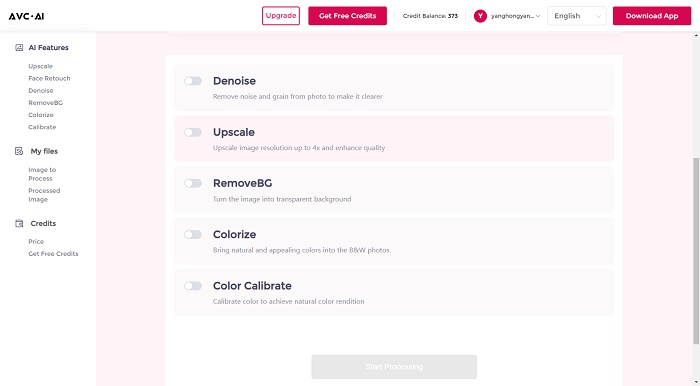
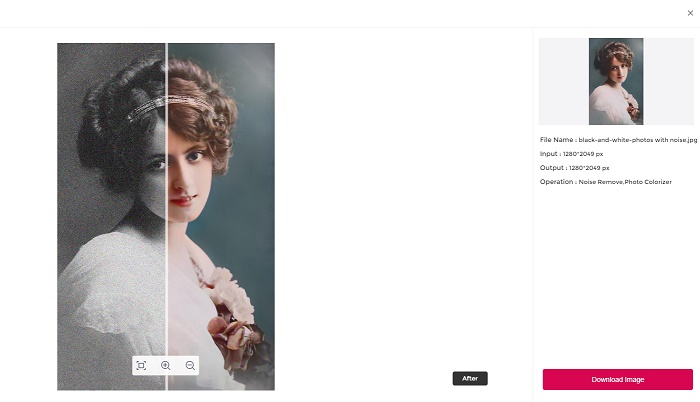
If you have uploaded multiple images to be processed, you can use different models for each image to process separately, or select multiple images and use the same model for batch processing. There are currently five models available: Denoise, Upscale, RemoveBG, Colorize and Color Calibrate. (Multiple models can be stacked together for processing)
After selecting the images and models, click on the Start Processing button to start process
Step 4: Preview and Download Images
When it finished, you can click the eye button to preview the results. If you are satisfied with it, then click Download Image to save the processed photo.
Note: The processed photos will be deleted after 72 hours, please download them in time.
Part3: Addition to Photo Restoration.
Photo restoration varies in complexity according to its classification. They can be roughly classified into the following categories.
Ordinary restoration: The original image is relatively well-preserved, and the blurring and breakage are not serious. This method uses the information of the original photo, tries to maintain the original appearance of the original photo, fixes the damage, removes the dirty spots, and correctly adjusts the color scale, brightness, and contrast of the photo. Do not make adjustments to the clarity of the photo, restore as much as possible
Advanced restoration: It usually applies for images with poor preservation, large damage area and serious blurring degree. Such photos can only refer to the original picture information and do a comprehensive renovation. Of course, if the original picture is clear, you can also do advanced restoration, because the more accurate it is, the better the effect will be. Advanced restoration is a relatively difficult technique in old photo restoration, using a combination of transplantation, synthesis and other techniques, and the restorer must also have an appreciation of painting and restoration skills and solid basic PS skills to complete.
Non-destructive restoration: Non-destructive restoration is to make perfect repairs to the damaged parts of the old photos without damaging the good parts of the photos.
Final Words
Now that you know more about the photo restoration. Each method of photo restoration has its pros and cons, and it's important to choose the right option for your particular needs and limitations. The first method is for those who are highly specialized and good at using professional editing software, the second one is better for restoring photos that are not in good shape and need a lot of work. You can also experiment with a combination of the two methods, to see which you prefer. If you are a novice of photo restoration, then AVC.AI is highly recommended.
Syncios D-Savior
Recover all types of data from HDDs, USB drives, SD cards, SSDs, etc. Learn more >>
Photo Enhancer AI
AI Image Upscale, Denoise, Colorize, Sharpen and Calibrate to enhance your photo quality.
AI Online Image and Video Tools
More AI-Powered Products
Tricks and Tips
- Top 8 AI Image Generators No Restrictions in 2026
- How to Blur Video in Canva: 5 Super Easy Steps
- 3 Ways to Fix Out-of-Focus Video: A Step-by-Step Guide
- Top 3 8K Video Players for PC in 2026 [Free & Paid]
- How to Convert Videos from 480P to 1080P
- Snapchat Face Swap: How to Change Face and Its Alternatives
- AI Video Upscaling: An Easy Way to Upscale Video to 1080p or 4K
- Perchance AI Image Generator: Full Review & Best Alternatives
- Topaz Video AI Review 2026: Is It Worth it?
- Free to Upscale SD Video to HD, 4K, and 8K in 2026
- Best 7 AI Hentai Generators in 2026 [Desktop & Online]
- How to Improve Video Quality Online for Free
- Best 5 Online Tools to Turn Pictures Into Coloring Pages For Free
- 10 Best Furry AI Generators to Free Create Fursona Art
- How to Blur the Background in Microsoft Teams on Windows, Mac, iOS and Android
- How to Unblur an Image
- 3 Best Forensic Video Enhancement Software
- 3 Methods to Fix Out of Focus Photo Easily in 2026
- 6 Best AI Photo Restoration Apps to Restore Old Photos
- How to Get Good Video Quality on CapCut Desktop [5 Ways Included]
- Sharpen Blurry Photos Online for Free
More Hot Articles
- 5 Unrestricted AI Image Generators in 2026 [Free]
- Best 4 AI Clothing Removers to Remove and Change Clothes in Photos
- Gramhir.pro AI Photo Generator Review and Its Alternative
- How to Mosaic Face in Videos to Keep Privacy Safe
- 11 Best Free Video Editing Software for Beginners (PC and Mac) in 2026
- How to Blur Background in iPhone Video (6 Practical Methods)
- How to Blur Licence Plate in Video: 5 Methods to Protect Your Privacy


