How to Transfer Photos from Google Pixel 9 to Computer
2020 runs officially for several days, and as you can see, in the last year, mobile phone market did well. especially the second half of the year. There are Samsung Galaxy S25 in August, iPhone 11 in September, and Google Pixel 9 in October. However, someone claimed that if you want the best camera in a phone and the most enjoyable Android experience, we should buy the Google Pixel 9 series.
If you agree with that, you must a Google Pixel user now. And I also believe you all had a pleasant time in 2019. In that way, you might have lots of photos on your Google Pixel phone, with your important families, lovely pet, old friends or a stranger who you met once but really hit it off. So in order to avoid saving large number of photos on your phone, you should read this tutorial to get how to transfer photos from Google Pixel 9 to computer.
Method 1. Transfer Photos from Google Pixel 9 via USB
As we all know, transfer data from an Android phone to a computer via USB is the commonest method.

Step 1Connect your Google Pixel 9 phone to computer via USB cable. You are supposed to click ‘Connected as a media device’ on the notification panel.
Step 2Open 'This PC' in your computer, you can see that Google Pixel 9 appears as a removable disk. Double click on the disk and there are many different folders, such as Movies, Pictures, Music and so on. You can 'copy > paste or directly 'drag-and-drop' the target music from local folder to your target folder (You can also add a new folder in your phone to save these new songs from computer.)
Method 2. Transfer Photos from Google Pixel 9 to Computer Selectively
Do you think you make such a mess of transferring photos when Google Pixel 9 appears as a removable disk? And you’re seeking for a clearer and easier method to finish the steps? If so, you’re supposed to know this amazing and free management tool:

Tool Required: Syncios MobiTrans Free
Syncios MobiTrans Free — Free iPhone/iPad/iPod/Android Manager
- Export or import photos, music, videos between computer and mobile phone.
- Backup and restore phone contacts, message and call history.
- Easily view and manage all phone files and folders.
Step 1Install and launch Syncios MobiTrans Free and connect your Google Pixel 9 to the computer.
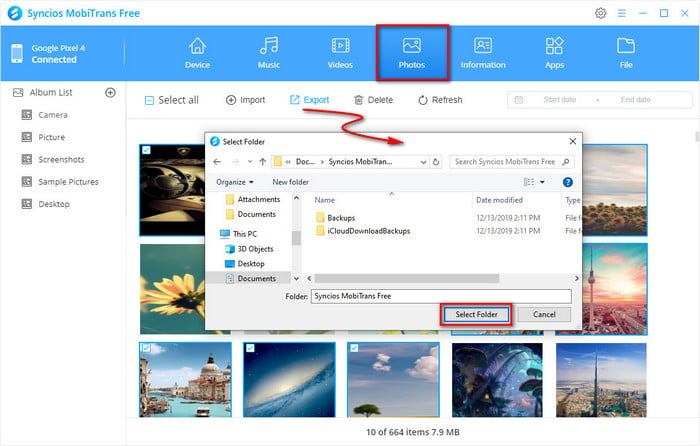
Step 2In the interface, there are Device, Music, Videos, Photos, Apps and File six modules. You should tap 'Pictures’ option to enter the page as following screenshot. You can click the tab on the left panel to change and view your pictures.
Step 3Then check one or multiple photos. Click ‘Export’ > ‘Select Folder’ option to begin photo transfer. After the transfer is complete, a pop-up window will show up automatically and that’s where your photos are saved in.

NOTE: Please don't forget to enable debugging mode on your Google Pixel 9. And if your Google Pixel phone still can't be detected by Syncios, you can check the following occasions:
① Haven't enabled USB debugging mode on your Google Pixel 9—If Developer options isn't available, go to 'Settings' > 'About phone' then tap Build number 7 times. Press on the Back icon to 'Settings' page, then select 'System' > 'Advanced' > 'Developer options'.
② If 'Allow USB debugging?' appears, tap 'OK' to confirm.
③ Failed to install Syncios Apk on your phone—go ‘Settings’ > ’Security’, check Unknown sources to allow downloading Syncios.
④ Tap ‘Connected as a media device’ or ‘Connected as a camera’ on your phone, use connection mode as MTP / PTP.
⑤ Mobile ADB driver should be installed.
⑥ USB cable or USB port is for normal use.
Method 3. Transfer Photos from Google Pixel 9 to Computer by One-Click
If you don’t need to preview these photos before transferring, and what you only want to do is to quickly transfer all of them from Google Pixel 9 to PC, you can try Syncios Data Transfer. It is the quickest answer for you to back up your phone to computer regularly on one-click.
Step 1Install and launch Syncios Data Transfer and connect your Google Pixel 9 to the computer.
There are three main parts of Syncios Data Transfer:
Transfer: transfer almost all files, including contacts, video, SMS, photos, call logs, music, bookmarks and more between unlimited mobile devices.
Restore: restore data from iTunes/iCloud backup or from iTunes Library to mobile phones. (Android devices and iOS devices)
Backup: backup your phone data to Mac without any loss.
Step 2Go to Backup module. Click 'Next' option to the following page. (Please make sure the default save path has enough space.)
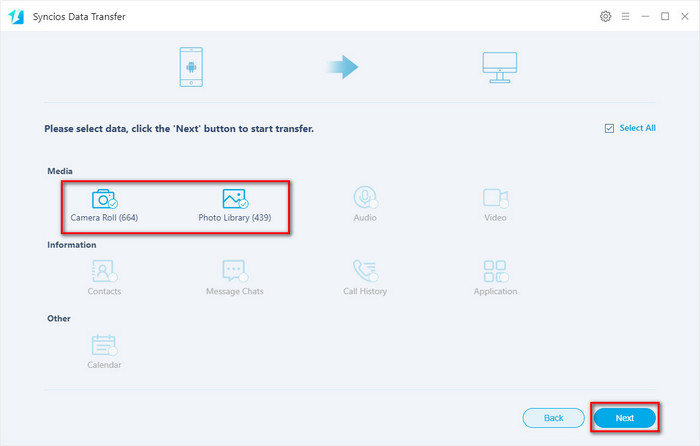
Step 3Check 'Camera Roll' and 'Photo Library' options. Tap 'Next' > 'Next' > 'OK' and wait till complete.

Conclusion
Now you know 3 methods to transfer photos from Google Pixel 9 to your computer. And it’s available for you to finish the steps via Syncios MobiTrans Free, Syncios Data Transfer or just move the photos manually. Let’s choose one you like and have a try now!


