![]() One management tool for all smartphones to transfer files between PC & iOS/Android devices.
One management tool for all smartphones to transfer files between PC & iOS/Android devices.
The Samsung Galaxy S25 is a high-end smartphone featuring a vibrant AMOLED display, powerful processor, and advanced camera system. It offers 5G connectivity, all-day battery life, and sleek design options. Ideal for productivity and entertainment.

It was a remarkable unveiling when Samsung introduced the Galaxy S25 Ultra, enhancing its flagship lineup with cutting-edge features and significant improvements. The Galaxy S25 Ultra boasts a large 6.9-inch Dynamic AMOLED 2x display with a resolution of 3120 x 1440 pixels, ensuring vivid visuals and smooth operation with a 120Hz refresh rate. Under the hood, it is powered by the advanced Snapdragon 8 Elite (for Galaxy) processor, paired with 12GB or 16GB of RAM for top-tier performance. The photography experience is elevated with a quad-camera setup that includes a 200-megapixel main sensor, alongside ultra-wide, telephoto, and periscope lenses, delivering versatile imaging capabilities. Selfies are handled by a high-quality 12-megapixel front-facing camera. Storage options include 256GB, 512GB, and 1TB, complemented by no expandable storage option due to the device's seamless unibody design. Running on Android, it comes with the latest version of Samsung's One UI interface. To keep up with the power demands, the Galaxy S25 Ultra is equipped with a robust 5,000 mAh battery, supporting fast charging and ensuring all-day usage.
Step 1 . Download and run Syncios Samsung Transfer Program
Download and install Syncios Mobile Backup & Restore Program on your computer first before doing the Samsung Galaxy S25/S25 Ultra backup and restore job.
Open debugging mode, plug your Samsung Galaxy A9 or A9 Pro to the computer and then run Syncios.
Click "Backup" button under "Backup and Restore" modle.
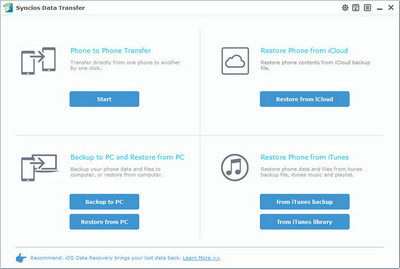
Step 2 . Backup all contents on Samsung Galaxy S25/S25 Ultra
In the main window, you are allowed to select items you would like to back up onto your computer. On the right panel, you will also have the option to change or choose the location of the backup data.
By default, all contents you can backup are ticked. You can also just tick your desired ones.
Then, click "Start Copy" button to backup your Samsung Galaxy S25/S25 Ultra content to computer.
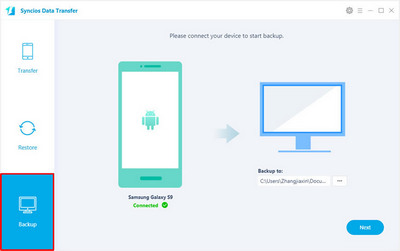
Step 3 . Restore Samsung Galaxy S25/S25 Ultra from backup files
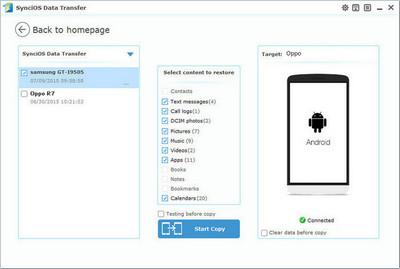
Go to the homepage of Syncios, click "Restore" beneath "Backup and Restore". All backups you have made with Syncios will be displayed on the left panel, just select your previous backup files from it, check data you would like to restore to your Samsung Galaxy A9 or A9 Pro.
Press Start Copy button, all of your selected files will be restored to the target device.
Tips: If your switch to a new phone one day, even an iOS device, Syncios is also capable of restoring your Samsung backup files to it, or directly transferring other phone data to your Samsung Galaxy A9 or A9 Pro. Learn more>>
Q: I already have Smart Switch, why do I need Syncios Data Transfer?
| Features | Samsung Smart Switch | Syncios Data Transfer |
|---|---|---|
| What can they transfer from iPhone to Samsung? | Photos, Contacts, Videos, Music, Notes, Calendar, Bookmarks, Messages | Photos; DCIM Photos, Contacts, Videos, Music, Bookmarks, Messages, Call logs, |
| How do they transfer? | 1. First you will need to back up your iPhone to iTunes; 2. Set up and launch Smart Switch on your computer; 3. Connect your Samsung to PC; 4. Locate and select iTunes backups to transfer to Samsung and click Start Transfer. |
1. Install and open Syncios on PC; 2. Connect both iPhone and Samsung to PC; 3.Select data to transfer and click Start Copy. |
| One-Way or two-way transfer? | Only iOS/Android-to-Samsung available | iOS-to-Android; Android-to-Android; iOS-to-iOS; Android-to-iOS Transfer |
| Supported device | Transfer to Samsung only | Supports all kinds of iOS & Android Phones/tablets |
| Supported OS | Windows / Mac | Windows / Mac |
| iTunes needed? | Use iTunes as intermediate | No needed |
Q: What about the Samsung Kies software? Can I use that to sync messages to my Samsung Galaxy S25/S25 Ultra?
The Kies 3 software is compatible with the Samsung Galaxy S25/S25 Ultra, however it will not support Windows 10 as Syncios does.
Q: Why is my computer not detecting my phone?
Make sure the USB drivers for the Samsung Galaxy S25/S25 Ultra is installed on your computer successfully. Try to use the USB caleb included with your device and turn on the USB debugging mode on your deivce.
